Introduction: The Timeless Appeal of the Top Hat
Historical Significance
The top hat stands as one of the most iconic pieces of headwear in fashion history. Emerging in the late 18th century, the top hat quickly became synonymous with elegance, wealth, and sophistication, finding resonance among aristocrats and gentlemen alike. It not only added height and poise to the wearer but also symbolized a refined social status. The rise of industries and the transition towards a modern society were marked by this elegant headgear.
Understanding the historical significance of the top hat provides valuable context for its timeless appeal. It played an essential role in various social events, from formal gatherings to theater outings. Notable figures such as Abraham Lincoln and Oscar Wilde are often remembered for their top hats, further cementing its status as a symbol of authority and intellect.
Moreover, the top hat has transcended its aristocratic beginnings to become a staple in various subcultures and fashion streams, including steampunk and high fashion. The versatility of the top hat makes it a cherished accessory in different eras and styles, reflecting its enduring charm.
Today, the top hat is still favored for special occasions like weddings, theater productions, and costume parties. By crafting your own top hat, you not only pay homage to its rich history but also create a unique piece that reflects your personal style.
Modern Appeal
Despite its historical roots, the top hat maintains a strong presence in modern fashion. Its classic design and distinctive silhouette provide a touch of sophistication and elegance, making it a versatile accessory. Whether it’s a high-profile event or a themed party, a top hat adds a stylish flair that few other accessories can match.
In contemporary fashion, the top hat is celebrated for its ability to add a statement to an outfit. Fashion designers and stylists often incorporate the top hat into their collections, contrasting its traditional look with modern aesthetics. This combination of old-world charm and contemporary style keeps the top hat relevant and trendy.
Additionally, the top hat has found a unique place in subcultures like cosplay and steampunk. Enthusiasts in these communities appreciate the hat’s ability to transport them to a different era, adding authenticity and drama to their costumes. This adaptability speaks to the top hat’s broader cultural significance and its ability to evoke nostalgia.
Understanding the modern appeal of the top hat highlights its multifaceted nature. It continues to be an essential accessory for a variety of occasions, bridging the gap between history and the present day. By adding a top hat to your wardrobe, you can effortlessly inject a dose of classic elegance into your modern style.
Materials and Tools for Making a Top Hat
Essential Materials
To craft your own top hat, gathering the necessary materials is crucial for a successful project. Here’s a list of essential items required for making a top hat:
- Felt Fabric or Buckram: The foundation of your top hat, felt fabric or buckram provides the necessary structure and firmness. Choose a color that suits your style, typically black or grey for a classic look.
- Cardboard or Heavy Paper: Used for the hat’s brim and crown, cardboard or heavy paper adds sturdiness. This base layer ensures the hat retains its shape.
- Millinery Wire: This wire is essential for reinforcing the hat’s brim, maintaining its shape and preventing sagging.
- Needle and Thread: High-quality needle and thread are required for stitching the hat components together. Choose a thread color that matches the felt fabric.
- Hot Glue Gun or Fabric Glue: Used for attaching various components, a glue gun provides a secure and neat finish.
- Ribbon or Trim: Decorative ribbons or trims enhance the hat’s appearance, adding a touch of sophistication.
- Hat Band: An internal hatband or sweatband provides comfort and a polished finish. It also helps the hat fit snugly.
Gathering these essential materials ensures you have everything you need to craft a high-quality top hat. Proper materials lay the foundation for a durable and stylish hat.
Recommended Tools
Having the right tools is essential for making a top hat efficiently and effectively. Here’s a list of recommended tools to aid in the hat-making process:
- Scissors: Sharp scissors are crucial for cutting felt fabric and cardboard. Accuracy in cutting is essential for clean lines.
- Measuring Tape and Ruler: Precise measurements are vital for creating a well-proportioned hat. A measuring tape and ruler ensure accuracy.
- Sewing Machine: While hand-stitching is an option, a sewing machine can expedite the process and provide even stitches, especially for larger components.
- Pins and Clips: These are useful for holding pieces together during assembly, ensuring they stay in place as you work.
- Pliers: Pliers are used to bend and cut millinery wire, ensuring it fits perfectly around the hat’s brim.
- Iron: An iron can help set the felt fabric, giving it a neat and smooth appearance. It is particularly important for removing creases.
- Pattern Templates: Patterns guide the cutting of felt and cardboard, ensuring each piece aligns correctly. Templates can be pre-made or self-designed.
Equipping yourself with these recommended tools ensures that the hat-making process is smooth and efficient. Proper tools enhance the quality of the finished hat, making crafting more enjoyable.
Steps to Make a Top Hat
Creating the Crown and Brim
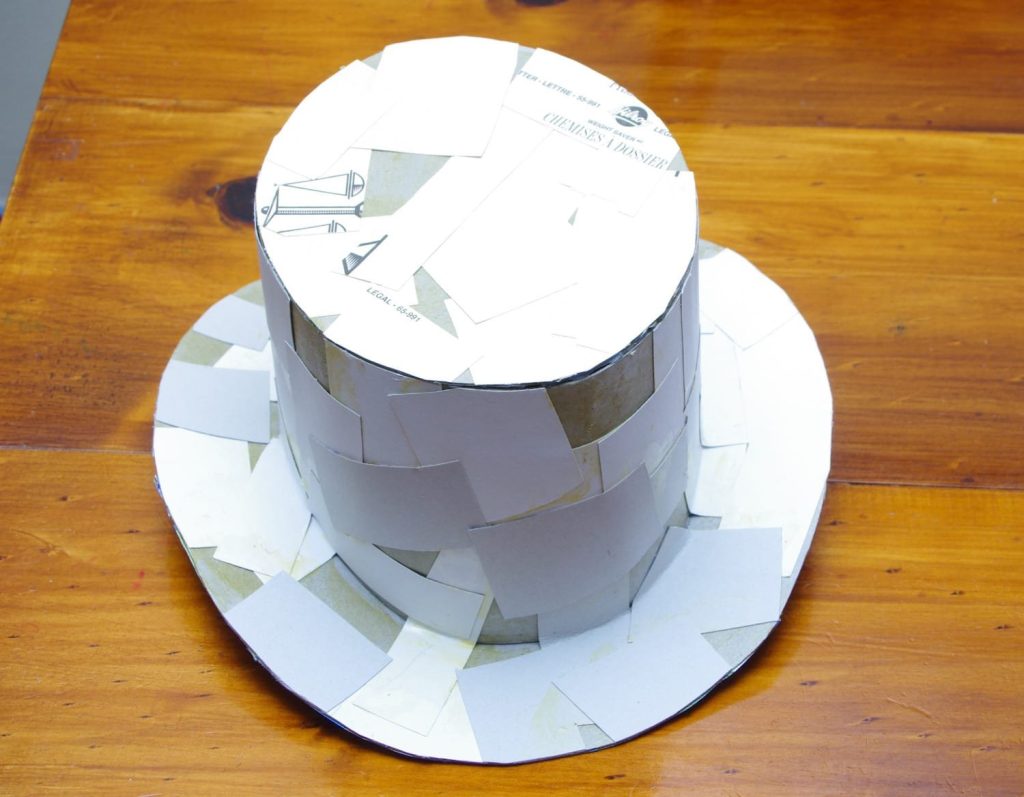
The first step in making a top hat involves creating the crown and brim. Begin by cutting the felt fabric and cardboard into precise shapes that will form the crown and brim of the hat.
- Create a Pattern: Use a pattern template for the hat’s crown and brim. The crown should be a cylindrical shape, while the brim needs to have a slight curve. Ensure the brim’s inner circumference matches the base of the crown.
- Cut the Cardboard: Cut the cardboard following the pattern. Two main pieces will form the bottom (brim) and sides (crown) of the hat. Use heavy paper or buckram for extra firmness.
- Assemble the Crown: Roll the cardboard piece for the crown into a cylinder and secure it with tape or glue. Ensure the edges are aligned evenly.
- Prepare the Brim: Cut an inner circle in the brim piece to fit the crown cylinder. Attach millinery wire around the outer edge of the brim using glue or tape. This wire will help maintain the shape.
- Join Crown and Brim: Insert the crown into the inner circle of the brim and secure it with tape or hot glue. Ensure it is centered and stable.
By creating a sturdy crown and brim, you lay the foundation for a well-structured top hat. This initial assembly step is crucial for achieving the desired shape and stability.
Covering and Decorating the Hat
Once the crown and brim are assembled, the next step is to cover and decorate the hat. This process transforms the base structure into a stylish top hat.
- Cover the Crown: Cut a piece of felt fabric slightly larger than the crown. Apply glue to the cardboard and smooth the felt over it, ensuring there are no wrinkles. Trim excess fabric.
- Cover the Brim: Cut two pieces of felt fabric, one for the top and one for the underside of the brim. Apply glue and smooth the felt over the cardboard, ensuring it adheres well. Trim the edges for a clean finish.
- Attach Ribbon and Trim: Add decorative elements such as a ribbon around the base of the crown, securing it with glue or sewing it in place. You can also add trims along the brim’s edge for a polished look.
- Add Hat Band: Attach an internal hatband or sweatband to the inside of the crown for added comfort. This band also ensures the hat fits snugly.
- Iron for Smooth Finish: Use an iron on a low setting to smooth any wrinkles and set the felt, ensuring a neat appearance.
Decorating the hat allows you to customize it to your preferences. From elegant ribbons to bold trims, the embellishments enhance the hat’s overall aesthetic.
Final Touches and Adjustments
The final step in making a top hat involves adding finishing touches and making necessary adjustments to ensure a perfect fit and appearance.
- Fit Check: Try the hat on to ensure it fits comfortably. If adjustments are needed, consider adding padding or adjusting the internal band.
- Reinforce Edges: Inspect the edges for any loose fabric or weak points. Reinforce areas with additional glue or stitching.
- Final Decoration: Add any last-minute decorations such as feathers, brooches, or additional trims. Ensure these elements are securely attached.
- Polish and Finish: Give the hat a final polish with a cloth to remove any glue marks or loose threads. This step ensures a clean and professional finish.

Final touches and adjustments are crucial for perfecting the hat. Attention to detail ensures that the top hat is comfortable, secure, and visually appealing.
Conclusion: Crafting Your Own Top Hat
Crafting a top hat is a rewarding and creative endeavor that allows you to combine historical elegance with modern style. From gathering essential materials and tools to assembling and decorating the hat, each step requires precision and creativity.
Understanding the historical significance and modern appeal of the top hat enhances the crafting experience, providing valuable context and inspiration. By carefully following the steps to create the crown, brim, and final decorations, you can craft a high-quality, stylish top hat perfect for various occasions.
The process of making a top hat not only results in a unique accessory but also allows you to showcase your craftsmanship and personal style. Whether for a special event, costume, or everyday fashion statement, your custom-made top hat will undoubtedly turn heads and make a lasting impression.